
Electronic Banking
While the Payrun Wizard enables you to process banking for employee payments, Ready Pay also provides the option to process additional bank transactions.
For example, this might include payments for Social Club, Child Support or PAYG Tax.
The file created is similar to the bank file created from the payrun, the only difference being the types of payments included in the file, for example:
- One transaction per payrun for total withholding tax contributions.
ATO bank account details are stored in the withholding tax pay items, found in reserved pay items. - One transaction per payrun for each deduction type, e.g. garnishee wages, union dues and social club contributions.
Bank accounts for deductions can be defined in the deduction pay item.
Transactions can be generated for an employee’s individual deduction by placing a unique lodgement reference on the deduction in the employee file.
To use this function, the bank Account Details must be completed within each of the relevant Pay Items via Company Definitions > Maintain Company, then the appropriate menu option, such as All Pay Items or State Taxes. Once there are Account Details listed for an item, an associated entry for that item will automatically be included in the Electronic Banking function for each payrun.
These transactions can then be processed as required.
The Electronic Remittance Window
- In Navigator, select Payrun Processes > Electronic Banking
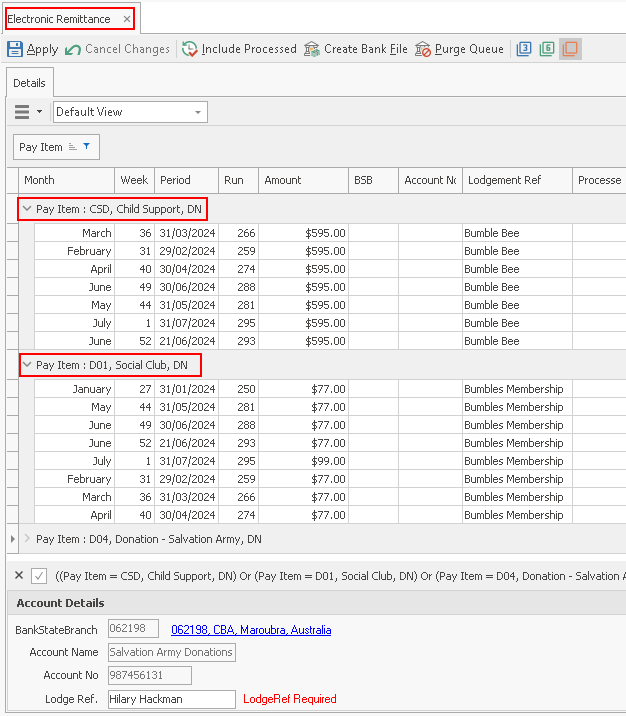
This opens the Electronic Remittance window.
By default, the window displays a list of transactions ready to be remitted.
The bank account details for the currently selected item are displayed in the bottom section of the Account Details window.
Display Options
This screen will automatically display payruns for the past three months. You may want to click the 3 or 6 button to display payruns for that number of months, or the All button to show all payruns: 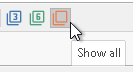
You may also click the Include Processed button:  if you want to include payruns that have previously been processed (i.e. have been processed and included in a Bank File) during the time frame specified.
Note that bank account details for the ATO automatically default to those entered by Ready Pay and should never need to be modified.
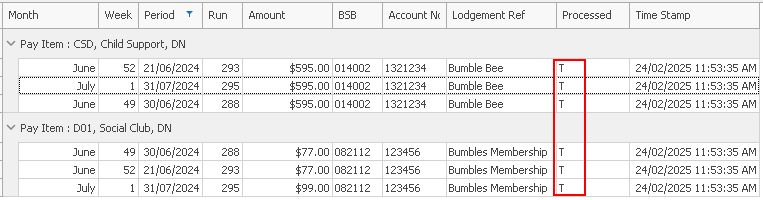
The columns in this window are self-explanatory, other than Processed, which can contain different options depending on the stage of the process.
Processed Column
- Blank: This is a new item in the electronic remittance file, and has not yet been processed. This is the default state of items (i.e. not processed, not purged)
- Q: This item has been placed in the queue and is ready for processing.
- T: Stands for True, i.e. the item has been processed.
You may show items which have been processed (remitted previously) by clicking Include Processed.
If necessary, items can be re-processed. For example, if you cannot locate the original file. The Time Stamp will then be updated. - F: Stands for False, i.e. the item has not been processed. This is an item which was previously selected for processing, then was purged from the list, or the window was closed prior to processing.
Creating an Electronic Remittance File
Selecting items for processing
- Single items can be selected by clicking on them with your mouse.
- The items are grouped by Pay Item (see Grouping Data). You may also choose to sort by an appropriate column, such as Run number (click on the Run column heading to sort in ascending/descending order).
Highlight the required items within the same Pay Item type and click Apply. - Multiple items can be selected but must be the same type of Pay Item. To select multiple items, use the Ctrl or Shift keys on your keyboard, and pick out the required items then click Apply.
Lodgement Reference
- The Account Details section includes a Lodgement Reference (Lodge Ref) for an item, if this has been defined previously in the Pay Item or Super Fund file.
- The Lodge Ref is an identifier of up to 18 characters which appears on the destination bank statement to identify the source of a payment via EFT.
- A Lodge Ref must be specified in order to process the transaction.
- A single Lodge Ref can be applied to multiple items. Once the items are selected (as described in Selecting items for processing) type in a Lodge Ref in the blank field within Account Details.
Processing the transactions
-
Once you have selected single or multiple items, as required, and have clicked Apply - the lower portion of the window will display the BSB number, the Account No and a Lodge Ref for the selected Pay Item type.
The Q in the Processed column indicates that the items are queued ready for processing. - Click Create Bank File
The Saving Details pop-up window is displayed. This shows the source bank account details, the Filename details (with file path and file name for your reference), and the Processed Date.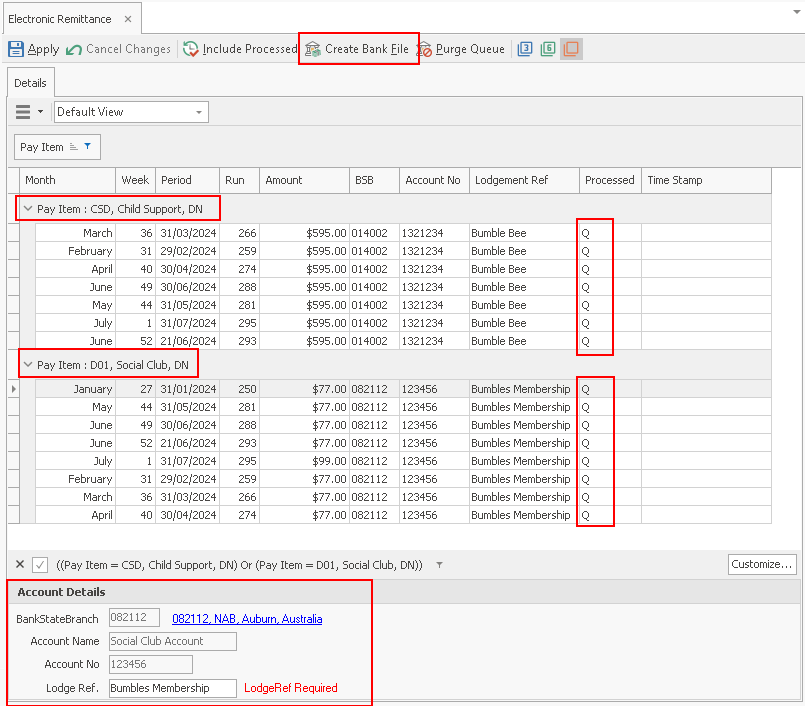
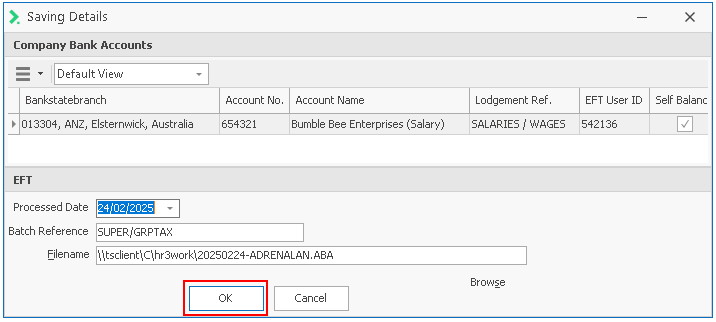
- Click OK . Once the EFT file is created the Processed Column changes from Q to T
If necessary, you may select multiple items (of the same Pay Item type) and click Apply to add Q to Processed. You can then select another group of multiple items (which must all be the same Pay Item type, but can be different to the previous group) and click Apply to queue these, refer to the screen shot at Point 2 above.
All the items can be processed in the same transaction by then clicking Create Bank File.
Purge Queue
If you have added an item in error, or want to reset the lodgement reference, you can purge the item from the queue.
Note that Purge Queue will be applied to all items with Q in the Processed column.
There is no need to select the Q items - simply click  .
.
This asks you to confirm that you want to reset all queued items. 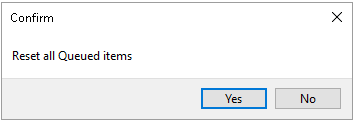
If you click Yes, all items which previously had Q in the Processed column will now show F.
Note that if you have selected items and clicked Apply so that these display Q in the Processed column, and you then close the window, this has the same result as clicking Purge Queue.
Next time you open this window, those items will appear with F in the Processed column.